TL;DR plug the ethernet cable coming from the modem into a port configured as WAN (i.e has a masquerade rule to the interface in the SNAT section). Have DHCP enabled. That’s it. In fact, it works pretty much with every router.
Now the long version, for the patient who want to go through my ramblings. Like in EE’s case, the documentation is wrong. I spent some time creating a 101 vif for eth0, just to look at the router with a rather frustrated look on my face that it doesn’t work. Got everything done and pointed to eth0.101 – NAT, port forwarding, the firewall policies for WAN, SQM. Then, nothing.
Went ahead and turned on DHCP for the eth0 interface. Within a few moments, I got an address on the interface. Wait, what? Turns out, the whole VLAN 101 thing does not apply for G.fast – sold as Faster 150 Fibre or Faster 300 Fibre.
There was absolutely no PPPoE nor MTU drama. As easy as it gets. Pretty much as it should.
Performance wise, the connection is slower, but it provides more throughput. Not as slow as Virgin Media which have atrocious latency and the buffer bloat is a joke – a really bad one. Not even SQM could save the slow and lossy DOCSIS 3.0, despite acceptable download throughput on VM.
When I say slow, I mean in terms of speed. The vast majority of people are illiterate in networking terms, and the worst offenders keep mentioning that “speed” is measured in “Mbps”. At least every person employed by an ISP should be forced to read this excellent article, which is, wow, around 24 years old now: It’s the Latency, Stupid.
So, to become un-stupid, speed = unit of distance divided by time, whereas throughput = rate of successful message delivery over a communication channel divided by time, typically measured in bits per second in networking. The multiples are used for practical reasons, hence Megabits per second in this century. The fact that they are both functions of time got people confused, then the marketing drones carried on.
In networking terms, knowing the actual speed doesn’t tell you much in fractions of the speed of light (it would be a very abstract number), so the measured latency of a round trip is used instead, but excluding networking adapters induced latency, there’s a relation between latency and the time it takes for the round trip for a given distance of network pipe. So, it is another measure for speed.
Having finally cleared what I mean by speed, let’s talk numbers.
TalkTalk has about 4ms extra latency compared to EE which sat around 7ms. It’s still nearly half of what Virgin Media used to achieve over DOCSIS 3.0, so I can’t complain. The upload throughput is virtually the same, mainly due to SQM – around 28 Mbps. Without SQM EE goes to 29 Mbps and TalkTalk to 30 Mbps (as quoted by the Openreach tier for this service), but the buffer bloat is terrible (for both). The download throughput is where I see most of the difference in terms of performance – 150 Mbps for TalkTalk while EE struggled to get to 142 Mbps, despite their minimum guaranteed being 143.8 Mbps.
I have raised this with EE, but they were like: everything is good on our side, we can send you an engineer. Well, the engineer would have probably billed me for a useless call. The DSL tester used by the engineer who came for the transfer clearly showed 159/30 while the Service ID was still pointing to EE. Therefore, I believe this is all down to that horrible thing called PPPoE.
The reason why I even had an engineer doing the easiest G.fast installation, ever, is that the G.fast service is only offered as managed installation, so they have to show up, test my power socket and my phone line, despite my service actually being online for months. Then, followed by about 3 hours of wait for my service to be transferred to the new ISP.
There are various guides about how to get Chef on a Raspberry Pi, but none I could find about how to build a proper Chef client package. People used to Omnibus packages (Chef, ChefDK) expect a certain consistency when deploying stuff.
I’m using the pi user for the following script under Raspbian Buster:
sudo apt-get install build-essential git ruby bundler
git clone https://github.com/chef/chef
cd chef
# checkout the desired Chef release tag, for example
git checkout v15.7.32
cd omnibus bundle install --without development --path vendor/bundle
sudo mkdir -p /var/cache/omnibus /opt/chef
sudo chown pi:pi /var/cache/omnibus /opt/chef # if building under the pi user
# git is being bit of a git - use proper values on an actual box, unless it's just
# a build box
git config --global user.email "[email protected]"
git config --global user.name "Your Name"
bundle exec omnibus build chef
# wait for an extreme amount of time...

# check the build results
ls -l pkg
total 32320
-rw-r--r-- 1 root root 33033164 Feb 7 22:07 chef_15.7.32+20200207193316-1_armhf.deb
-rw-r--r-- 1 root root 52348 Feb 7 22:07 chef_15.7.32+20200207193316-1_armhf.deb.metadata.json
-rw-r--r-- 1 root root 6894 Feb 7 22:07 version-manifest.json

dpkg -I pkg/chef_15.7.32+20200207193316-1_armhf.deb
new Debian package, version 2.0.
size 33033164 bytes: control archive=327544 bytes.
298 bytes, 11 lines control
1552093 bytes, 12722 lines md5sums
3190 bytes, 111 lines * postinst #!/bin/sh
1226 bytes, 50 lines * postrm #!/bin/sh
837 bytes, 23 lines * preinst #!/bin/sh
Package: chef
Version: 15.7.32+20200207193316-1
License: Chef EULA
Vendor: Omnibus <[email protected]>
Architecture: armhf
Maintainer: Chef Software, Inc. <[email protected]>
Installed-Size: 121364
Section: misc
Priority: extra
Homepage: https://www.chef.io
Description: The full stack of chef
In fact, other than the pi user, none of the above steps are Raspbian specific. They work on pretty much all Debian-based distributions. With the exception of the apt-get line, all the steps are in fact distribution agnostic, but I had to learn them the hard way.
After a huge amount of wait, behold a chef deb ready to be installed. That amount may be significantly shorter on a Raspberry Pi 3 or 4B as Omnibus makes use of all CPU cores.
Emulating a Raspberry Pi
While this may not be necessary, I don’t always have a Raspberry Pi I can kill (read stress, I never had one fail) with package builds. It was quite the challenge to find the winning combination. While the build benefits from better storage and more RAM, the CPU speed isn’t impressive. However, speed isn’t the purpose. While it’s possible to use this under native qemu, regardless of host OS, I went the VM route to have more predictable results. The macOS qemu is painful to work with anyway.
Vagrant to the rescue:
Vagrant.configure('2') do |config|
  config.vm.box = 'bento/ubuntu-16.04'
  config.vm.box_check_update = true

  config.vm.provider 'virtualbox' do |vb|
    vb.name = 'ubuntu-pi'
    vb.cpus = 4
    vb.memory = 2048
    vb.customize ['modifyvm', :id, '--nictype1', 'virtio']
  end
end
This is a fairly standard Vagrantfile. The vb.customize bit makes sure the network interface uses virtio. I’ve had issues in the past with wobbly performance using the default NIC type.
The actual setup for chroot-ing into a qemu-user-static container is excellently described on the Debian Wiki. The only change was Raspbian Buster which is the current release. I have increased the Raspbian root volume by 4096 MiB.
I have used systemd-nspawn, then after chroot-ing, killed the entry in /etc/ld.so.preload as it spams the shell with messages about failing to load a rather useless library in this setup.
Then, simply use the Raspbian script that I have used on actual Raspberry Pi’s.
This one took some effort. Actually, my first setup had Authy’s OpenVPN plugin and their 7 digit TOTP flavour, but it always felt wrong to require a service in the middle for something which needs a shared secret and the clock to be within the same window. There’s no actual requirement for a service here. Twillio also decided to stop maintaining the Authy plugin, so there’s not a lot of great news in the middleware department.
There’s no TOTP support in OpenVPN. OATH toolkit came to the rescue. To make the two work together, there’s a PAM module for OATH, pam_oath. OpenVPN has a PAM plugin. Now, this seems as easy as RTFM, but, it isn’t. Couple of years ago when I made this setup first, there was no comprehensive end-to-end guide on how to achieve this. PAM isn’t the most friendliest environment to debug. When you add the slowdown of having to input random 6 digit codes for every try to see what’s going on, the whole process comes to a grinding halt.
The OpenVPN authentication strategy:
Static key tls-auth. This is something which OpenVPN does and it is recommended in most cases. The second benefit of having this on is that the server doesn’t identify itself as OpenVPN, like it does without tls-auth. There’s no banner to grab to please those doing enumeration. If the right TLS key with the right direction isn’t presented within a fairly short window of time, the connection is simply closed.
Mutual TLS authentication. This is pretty standard in the OpenVPN world where you have a CA, the server gets a cert + key, the clients get certs + keys. This is an excellent guide on how to create a CA. I’m pointing this one out as most guides forget to mention the X509v3 extensions. OpenVPN is honouring the server_cert and the usr_cert extensions which I have accidentally discovered trying to do mutual auth with a cert issued by the same CA with the server_cert extension. Pro Tip: the CRL must not be expired as it drops the mutual authentication despite the server and client having valid certificates. Other people and I have learned this the hard way. This isn’t an OpenVPN specific problem as, for example, I have had the same problem with Haproxy-based mutual authentication and very unhelpful errors about “expired certificates” when the expired bit is the revocation list itself.
TOTP via the PAM plugin. Because not all OpenVPN clients can handle the OTP field, this is implemented on top of the username + password fields. This isn’t an issue for the CLI client, but most GUI options aren’t smart enough to prompt for username + password + OTP. Given that this is the 3rd authentication factor besides the static key tls-auth and mutual TLS auth, the lack of password isn’t a problem.
Bear in mind that the actual plugin path may be different on your distribution. This is an Ubuntu example. The reneg-sec 0 option disables the re-keying which otherwise will drop the VPN connection unannounced. By default this is set to 3600 seconds and I had a fun time determining why my connection was dropping until I realised it happens periodically. Sometimes it wouldn’t even reconnect after such drop. The problem is caused by the fact that the re-keying can not happen with the credentials provided upon the initial connection since by design the TOTP has only a limited amount of time during which the OTP is valid.
The first bit after the .so, “openvpn”, is the name of the PAM module. The “login” argument gets the USERNAME value from the OpenVPN authentication dialogue, and the “one-time” argument gets the PASSWORD value from the OpenVPN authentication dialogue. The client configuration needs auth-user-pass to prompt for the username and OTP, besides the mutual TLS auth configuration options, ca, cert, and key.
The PAM module is configured in /etc/pam.d/openvpn and reads as follows:
The first line of that module is where pam_oath is actually referenced. The “usersfile” path is where the credentials are stored i.e the “login” – checked against USERNAME and “one-time” seed – checked against PASSWORD. 6 digits is the typical TOTP used by most authenticator apps, although FreeOTP supports 8 digit TOTP as well. The window sets the search depth rather than being a reference for a time window.
The second line is just waiving by anybody who’s passing the OTP challenge. That line took the most effort to get there after a lot of groaning, swearing, and generally ranting about PAM and non-sensical error messages. Turns out, an actual account is required in the PAM flow after auth, but there isn’t one as there’s no account anywhere, whether the system itself or another authentication system, to match the OTP username. pam_permit must not be used without having a proper use case. This is one of those use cases. Otherwise, it may be a catastrophic security issue if used as a solution for every PAM problem. You have been warned!
The users.oath file itself needs to be properly protected as all the pre-shared OTP secrets live there. Basically root rw and nothing else. Even though my openvpn worker process, i.e the one taking in client connections, runs as nobody, that file is still readable/writable as the master process runs as root. Every time a successful challenge is passed, pam_oath updates that file.
The structure of users.oath is: Option User Prefix Seed. The manual is not brilliant, therefore I can’t tell why the prefix is just a dash, but for all intents and purposes, this is unused. The Arch wiki explains this better.
TOTP is a particular case of HOTP i.e the counter is substituted for a non-decreasing time value, hence the Option reads HOTP/T30/6 which makes it the most common TOTP scheme – 30 seconds time step size with 6 digits OTP. Authy, Google Authenticator, FreeOTP, etc. support this. 6 digits is a commonly used number, not the mandated number of digits. The number of digits must match the digits value passed as argument to pam_oath.
“foo” is the username value. I have only tried alphanumeric values in there, therefore I can’t really tell what OATH tookit truly supports i.e whether dashes, dots, and underscores are supported. I know there’s groaning in some tooling when UNIX usernames contains characters like dot, hence mentioning this.
The “-” dash is the prefix.
The hex code is the pre-shared secret. RFC 4226 says:
The algorithm MUST use a strong shared secret. The length of the shared secret MUST be at least 128 bits. This document RECOMMENDs a shared secret length of 160 bits.
RFC 4226 – Section 4, R6
That secret is hex encoded, which means it uses 2 characters for each byte. That makes the minimum length 32 hex chars to encode 128 bits.
For example, one can use this to generate secrets:
That line generates 256 bit secrets which is above the recommended value. While sha256sum itself generates 256 bit values, putting that through oathtool has more benefits. The hex secret value is simply reflecting the input hex secret.
The interesting bits (pun not intended): the Hex secret and the Base32 secret. The hex encoded secret of the TOTP goes into users.oath. The Base32 encoded secret may be used to generate QR codes which may be easily read with an authenticator app on your phone, like Authy, Google Authenticator, FreeOTP, etc.
Getting G.fast in my area was kind of a bad news – no plans for FTTP any time soon. However, it provided a choice that before did not really exist as Virgin Media surely knows how to milk their loyal customers/hostages.
There’s:
Virgin Media’s higher download throughput lower upload throughput higher latency DOCSIS 3 – with abysmal latency sometimes which affects near realtime communication due to the crappy Intel Puma 6 in their hubs or the usual cable high latency.
Opeanreach’s lower download throughput higher upload throughput lower latency G.fast – essentially glorified VDSL2 which is very sensitive to the phone line length. Basically BT, but with a different name because reasons, but still a fully owned subsidiary.
Yup, this is the sorry state of decade-behind-the-times broadband infrastructure in the UK for the people who don’t live in the upper 10% of places with FTTP.
My G.fast plan from EE came with a VDSL2 router/modem (EE Smart Hub), so, fortunately, Openreach provided a Huawei MT992 G.fast modem. They call this a managed installation as the modem is supported by Openreach. Unlike the parent company, BT, EE still offer the older Smart Hub which doesn’t have G.fast support. That’s not the case with BT’s Smart Hub 2. To add insult to the injury, the vast majority of these CPE’s on Openreach’s network don’t support bridge (aka modem mode) like Virgin’s SuperHub does. This is one of the bits that Virgin is doing right.
This ISP assumption that all of their customers are simpletons is rather disturbing. To be clear, this isn’t Openreach’s fault, but the standard MO for most of the ISP’s using their network. So, getting an MT992 with my installation was a blessing as the market is sorely missing enough options for G.fast modems. You do get the odd MT992 listing on eBay for £300, but that price is clearly a pipe dream.
Using double NAT with the Smart Hub and my proper Edgerouter always felt wrong. It is wrong. For those with Smart Hub 2 this is the only solution until some company, like Draytek, steps up to the game with Vigor 166 and I expect acceptable prices. That doesn’t mean cheap – it just means significantly less than £300 on eBay.
To circle back to configuration, both the EE documentation and their support engineer were wrong. Phoned for an unrelated problem, but the possibility of using my own device in place of their CPE came up. They said that the communication between the MT992 modem and their Smart Hub uses a proprietary protocol – something which I did not buy.
Armed with the PPPoE credentials determined by reading their documentation (that bit is accurate), got the PPPoE up and running on my Edgerouter straight away. That’s Add Interface > Add PPPoE from the router homepage, but I have used their recommended 1492 MTU.
However, it didn’t take long to figure out that something is wrong – some websites were loading, but some were not. This kind of red herring made it more difficult to pinpoint the source of the problem, until I somehow remembered that QUIC is a thing and that some websites are using it. So, I have reliably determined that UDP based protocols (like DNS and QUIC) were fine, whereas anything TCP based was getting blackholed.
Cue the classic Path MTU Discovery problem because someone somewhere decided that ICMP is too much of a risk. You got to love the security theatre.
The first step was to enable the TCP MSS clamping. This immediately solved the TCP blackholing issues and it proved that indeed the MTU for the PPPoE interface is wrong. Can’t remember the actual value and I don’t want to. PPPoE is horrible enough that I don’t want to take a second performance hit if the TCP MSS clamping can be avoided.
Set the PPPoE interface (pppoe0) MTU to the full 1500.
Set the eth0 interface MTU to 1508. This is configured as WAN 1 on my router and it connects straight into the MT992 modem. It is the parent interface for the pppoe0 interface.
That’s it. No MSS clamping and no TCP blackholing issues either. There’s certainly no proprietary protocol either as the Edgerouter has been working for months and I have not observed any loss of performance compared to the EE Smart Hub.
I’ve this router for the sole reason that it is a recommended piece of equipment for doing WiFu, but as as I previously mentioned, it fails to do its job.
In the mean time, I discovered that Netgear released some GPL firmwares which sit at the base of their firmwares. Basically you get a heavily modified OpenWrt Kamikaze (7.09) without a web interface and you need an ancient buildroot. You do have a command line utility for configuring it, but it is painful to do it so. I was unable to configure the WEP support in 1.0.0.5 GPL by using the same config as the 1.0.1.1 is using. Also, moving around the GPL firmware is difficult since there’s no vi support in busybox, but there’s a tftp client and cat.
The device itself is EOL, therefore the idea of using OpenWrt came up. I tried the generic AP81 build, as described here, but it corrupts the rootfs. The device boots in failsafe mode where you may flash a good firmware by using a TFTP client, therefore on the recovery side is good.
On the WikiDevi page for WNR1000v2 it is stated that it is using the same hardware as WNR612v2, but the WNR612v2 router has only two LAN ports, while WNR1000v2 has four. WNR612v2 itself uses hardware close to WNR2000v3 and both of these are supported by OpenWrt.
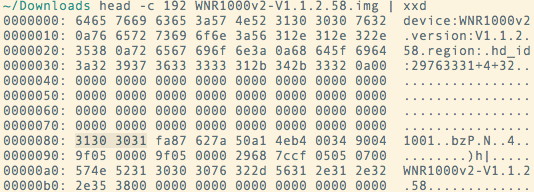
Flashing a WNR612v2 firmware, both factory and OpenWrt is impossible with the default images. The Netgear flashing support checks for the presence of a “magic number” in the firmware file. The procedure for finding that “magic number” is totally undocumented, therefore I’ve made a lot of wrong turns. I used the WNR612v2 “magic number” which is declared in OpenWrt, 0x32303631, and started to examine the firmware file. A quick grep confirmed that the byte sequence is present. Dumping the header of the file also confirmed it.
I repeated the procedure with the GPL firmware which I built for WNR1000v2 and with a factory firmware. It turns out that the magic number is: 0x31303031.
The rest of the work for adding WNR1000v2 support to OpenWrt was fairly straightforward after that as I used WNR2000v3 and WNR612v2 as template.
The rfkill and the WPS buttons don’t work at all. I don’t use WPS anyway, therefore for me is a non-issue. The lack of rfkill support may be a mild annoyance, but since this is my first router that actually has a button for toggling the wireless, doing it the usual way isn’t a big deal for me. I think the buttons may be controlled by GPIO, but I’m not sure and probably I’ll check this when my schedule allows it.
The patch and images are available into this Gist. The patch was made against the Barrier Breaker branch, r43617. The procedure for building your image if you don’t want to use my own image is described into the README.
I guess the next step is to add this support into the OpenWrt trunk, but I need to see if somebody is willing to merge the changes for supporting this device. I’ll need to test the patch and build more since the first merge with quilt wasn’t without issues. The purpose is to obtain a clean build in a single run.
Manage Cookie Consent
We use cookies to optimise our website and our service.
Functional
Always active
The technical storage or access is strictly necessary for the legitimate purpose of enabling the use of a specific service explicitly requested by the subscriber or user, or for the sole purpose of carrying out the transmission of a communication over an electronic communications network.
Preferences
The technical storage or access is necessary for the legitimate purpose of storing preferences that are not requested by the subscriber or user.
Statistics
The technical storage or access that is used exclusively for statistical purposes.The technical storage or access that is used exclusively for anonymous statistical purposes. Without a subpoena, voluntary compliance on the part of your Internet Service Provider, or additional records from a third party, information stored or retrieved for this purpose alone cannot usually be used to identify you.
Marketing
The technical storage or access is required to create user profiles to send advertising, or to track the user on a website or across several websites for similar marketing purposes.